Our blog is here to demystify the process of creating and maintaining Outlook categories. Sometimes, your inbox can be like a disorganized office. Jumbled messages in between sale advertisements and social media notifications make it difficult to locate important emails. We will help you organize your inbox to easily locate important emails from your boss without having to search for them. Together, let us go through the process of decluttering and optimizing your Outlook experience! This is the reality for many email users who haven’t discovered the power of Outlook Categories.
What are Outlook Categories?
Think of categories as colorful labels you can apply to your emails. They act like a visual filing system, allowing you to organize and prioritize your messages at a glance. Instead of relying on endless folders (which can become overwhelming themselves), categories offer a flexible and dynamic way to bring order to your email chaos.
The Problem with a Disorganized Inbox
A disorganized inbox isn’t just an aesthetic issue – it can significantly impact your productivity and well-being. Here’s why:
- Wasted Time: Spending minutes, even hours, searching for important messages eats away at your valuable time.
- Missed Opportunities: Critical emails might slip through the cracks, leading to missed deadlines or forgotten commitments.
- Increased Stress: The constant feeling of being overwhelmed by a cluttered inbox can elevate stress levels.
How to Add Categories in Outlook?
Now that you understand the transformative power of categories, let’s dive into how to create and use them in Outlook.
Outlook Desktop App:
- Access the Categories Menu: In the ribbon at the top, locate the “Tags” section. Click the “Categorize” dropdown menu and select “All Categories.”
- Create a New Category: In the “All Categories” window, click the + Create Category button.
- Name and Color Your Category: Enter a descriptive name for your category in the “Name” field. Choose a color from the palette that visually represents the category.
- Save the Category: Click Save to create your new category.
Outlook Web App:
- Open an Email: Select any email message you want to categorize.
- Access the Categorize Menu: Click on the three dots menu (…) in the top toolbar of the open email. Choose “Categorize” from the options.
- Add or Manage Categories:
- Add a Category: If you haven’t created any categories yet, click Add a category. Enter a name and choose a color for your new category, then click Done.
- Select an Existing Category: If you already have categories, simply select the desired category from the list.
Outlook Mobile App:
- Access Settings: Open the Outlook mobile app and tap on your profile picture or initials in the top left corner. Navigate to Settings.
- Find Categories: Scroll down in the Settings menu and locate the Preferences section (Android) or Mail section (iOS). Look for the Categories option and tap on it.
- Add or Manage Categories:
- Add a Category: Tap Add a Category. Enter a name and choose a color for your new category, then tap Done.
- Select an Existing Category: If you already have categories, simply select the desired category from the list.
Additional Notes:
- You can create as many categories as needed to organize your emails effectively.
- Once you’ve created categories, you can assign them to emails by following the same steps mentioned above (depending on the Outlook version you’re using).
- Remember, consistency is key! Use the same categories and colors across all your Outlook platforms (desktop, web, mobile) for a seamless organizational experience.
How to categorize emails in Outlook?
The key to effective categorization lies in creating a system that works for you. Here are some tips to get you started:
- Identify Your Needs: Consider how you typically manage your emails. Do you prioritize by project, client, or urgency? Build categories that reflect your workflow.
- Start Simple: Begin with a handful of broad categories like “Important,” “Work,” “Personal,” and “Follow Up.” You can always add more specific categories later.
- Maintain Consistency: Once you establish your system, stick to it! Use the same categories and colors consistently for each type of email.
Outlook Color Code Emails Based on Category
Colors add a powerful visual dimension to your categories. Assigning distinct colors helps you quickly identify emails at a glance. Here are some tips for color coding:
- Use Color Psychology: Red might signify urgency, while blue could represent tasks or follow-ups. Green can indicate project-related emails, and yellow might highlight important personal messages.
- Maintain Consistency: Always associate the same color with a specific category for easy recognition.
- Personalize Your Palette: Choose colors that resonate with you and make your inbox visually appealing. Don’t be afraid to experiment to find a system that works best.
Setting Up Color-Coded Categories
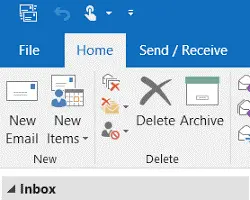
- Go to the “Home” tab and click on “Categorize” in the Tags group.
- Select “All Categories“.
- Choose a category and assign a color.
- Click “OK” to save the changes.
Optional: Keyboard Shortcuts for Efficiency
For power users, keyboard shortcuts can significantly speed up the categorization process. You can assign keyboard shortcuts to specific categories within Outlook settings. This can be a great time-saver for those who categorize emails frequently.
Assigning Categories to Emails
Once you’ve created your perfect categorization system, it’s time to put it into action! Here’s how to assign categories to your emails:
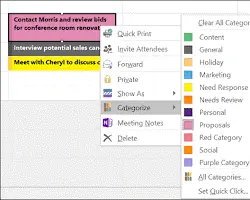
Categorizing Individual Emails
There are two main ways to categorize individual emails in Outlook:
- From the Message List: Select the email you want to categorize. Right-click anywhere on the message and hover over “Categorize.” A list of your existing categories will appear. Simply choose the appropriate category to apply it to the email.
- From the Reading Pane: Open the email you want to categorize. In the “Tags” section of the ribbon (Outlook desktop app) or from the three dots menu in the top toolbar (Outlook web app), select “Categorize” and choose the desired category.
Bulk Categorization for Efficiency
For a large number of emails, categorizing them individually can be time-consuming. Thankfully, Outlook offers options for bulk categorization:
- Multi-Select Categorization: Hold down the “Ctrl” key (Windows) or “Command” key (Mac) and click on multiple emails you want to categorize. Then, right-click and choose “Categorize” followed by the desired category.
- Search and Categorize: Utilize the search bar in Outlook to find emails based on specific criteria (sender, recipient, keywords). Once the search results display, right-click on any email in the list and choose “Categorize” to apply the category to all search results.
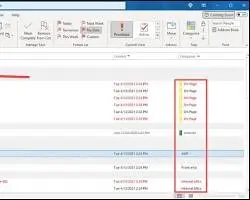
Finding and Filtering Emails by Category
Now that your emails are neatly categorized, it’s time to reap the benefits of this organization. Here’s how to leverage categories for efficient email retrieval:
Using the Navigation Pane
The navigation pane in Outlook acts as a command center for your categorized emails. Here’s how to utilize it:
- Show Category Checkboxes: Ensure the category checkboxes are displayed in the navigation pane. In Outlook desktop, right-click on the navigation pane and select “Show Categories.” In the web app, click the gear icon and choose “View Settings” followed by “Show Categories.”
- Filter by Category: Simply click the checkbox next to the desired category in the navigation pane. This will display only emails categorized under that specific label. You can select multiple categories for a more refined search.
- Quick Access: The navigation pane allows you to easily switch between different categories, providing quick access to the emails you need.
Advanced Search with Categories
While the navigation pane offers a quick filtering option, Outlook’s advanced search capabilities unlock even more powerful ways to find specific emails:
- Combine Categories with Other Search Criteria: In the search bar, you can combine category selection with other search terms like sender, recipient, keywords, or date range. This allows for highly targeted searches that pinpoint the exact emails you’re looking for.
- Search Within Categories: You can use the search bar to find specific terms within emails categorized under a particular label. This is helpful when you remember a keyword but not the exact email details.
How to use categories in Outlook?
Now that you’ve grasped the fundamentals of creating, assigning, and searching for categorized emails, let’s explore how to leverage this system for maximum organizational impact. Here’s how categories can transform your workflow in various aspects:
Project Management with Categories
Managing projects through email can be chaotic. Categories can bring much-needed structure:
- Categorize by Project: Create dedicated categories for each project you’re working on. This allows you to easily filter and view all project-related emails in one place.
- Subcategorize for Tasks: Within each project category, consider creating subcategories for different project phases (e.g., Planning, Development, Review). This provides a granular view of project communication.
- Prioritize Action Items: Use color-coding to highlight urgent tasks within project categories. This ensures critical project information stands out in your inbox.
Client Communication Categorization
Effective client communication is paramount. Categories can help you manage client emails efficiently:
- Categorize by Client: Create distinct categories for each client or project. This allows you to quickly review email history with a specific client.
- Track Follow-Ups: Within client categories, consider a subcategory for “Follow Up” emails. This ensures you don’t miss any critical action items related to client communication.
- Maintain Transparency: Share your categorization system with your team members, allowing everyone to access and categorize client emails consistently.
Prioritization and Focus with Categories
The constant influx of emails can make it challenging to maintain focus. Categories can help you prioritize effectively:
- “Important” Category: Create a category for high-priority emails that require immediate attention. Assign a prominent color (like red) for easy visual identification.
- “Action Required” Subcategory: Within your “Important” category, consider adding a subcategory for emails requiring action from your end. This helps you track tasks you need to complete.
- Schedule Time for Categorized Emails: Dedicate specific times in your schedule to deal with emails from different categories. This ensures you’re giving focused attention to each priority level.
Beyond the Inbox: Categorizing Other Outlook Items
The power of categories extends beyond just emails. You can leverage this organizational tool for other elements within Outlook, creating a cohesive and streamlined workspace.
Organizing Tasks with Categories
Your to-do list shouldn’t be an afterthought. Categories can help you manage tasks within Outlook more effectively:
- Categorize by Project or Context: Assign categories to tasks based on the project they belong to or the context in which they need to be completed (e.g., “Work,” “Personal,” “Errands”). This allows you to filter and view tasks associated with specific projects or areas of focus.
- Prioritize with Color-Coding: Use color-coding to visually distinguish between urgent and less pressing tasks. For example, red could signify high-priority tasks, while yellow could represent tasks that can be completed later.
- Combine Categories and Due Dates: Combine category filtering with due dates to create a highly customized task management system. This allows you to zero in on specific tasks based on both category and urgency.
Color-Coding Calendar Events
A cluttered calendar can be overwhelming. Categories can help you bring visual clarity to your schedule:
- Categorize by Event Type: Create categories for different types of events (e.g., “Meetings,” “Deadlines,” “Travel”). Assigning a distinct color to each category allows you to quickly identify the nature of each event on your calendar.
- Personalize Your System: You can further customize your categorization system by using colors to represent specific projects, clients, or team members associated with calendar events.
- Filter Your Schedule: Utilize category filtering within the calendar view to focus on specific types of events. This allows you to see only the appointments or meetings relevant to your current needs.
Keeping Contacts Categorized
Your network of contacts is valuable. Categories can help you manage your contacts more efficiently:
- Categorize by Client, Company, or Project: Assign categories to contacts based on their association with clients, companies, or specific projects. This allows you to easily filter and find contact information relevant to your current task.
- Group Team Members: If you work with specific teams frequently, consider creating a category for each team and assigning it to relevant contacts. This allows you to quickly find contact details for all team members involved in a project.
- Prioritize Important Contacts: Use a dedicated category (with a prominent color) to highlight your most important contacts for easy access.
Advanced Customization: Subcategories and Rules
For those who crave even more control over their organization, Outlook offers advanced features that can take your categorization system to the next level.
Creating Subcategories for Deeper Organization
While categories provide a broad organizational framework, subcategories allow you to delve deeper:
- Subcategorize by Priority: Within a project category, create subcategories for “High Priority,” “Medium Priority,” and “Low Priority.” This allows for a more granular view of project-related emails.
- Subcategorize by Task Stage: For tasks within a project, create subcategories like “To Do,” “In Progress,” and “Completed.” This provides a clear visual representation of the progress on various tasks within a project.
- Subcategorize by Client Contact: Within a client category, create subcategories for different contact people within the same client organization. This allows you to easily filter emails related to specific client representatives.
Automating Categorization with Rules
For repetitive tasks, Outlook’s rule engine can automate the categorization process:
- Rule-Based Categorization: Create rules based on specific criteria like sender, recipient, keywords, or subject line. When an email arrives that meets the rule criteria, it can be automatically categorized.
- Save Time and Effort: Automating categorization saves you valuable time and ensures consistency in your organizational system.
- Focus on More Important Tasks: By automating repetitive tasks like categorization, you can free up your mental space to focus on more strategic work.
Here’s an example of a rule:
- If the sender’s email address contains “marketing” and the subject line contains “report,” then automatically categorize the email as “Marketing Reports.”
Best Practices for Using Outlook Categories
Having explored the power and flexibility of Outlook categories, let’s delve into some best practices to ensure you get the most out of this organizational tool:
Maintaining Consistency in Your System
The key to effective categorization lies in consistency. Here are some tips:
- Develop a Naming Convention: Establish clear and consistent naming conventions for your categories and subcategories. This ensures everyone using the system understands the meaning behind each label.
- Train Team Members: If you’re working in a team environment, share your categorization system with your colleagues. Encourage them to adopt the system for consistent communication and information flow.
- Minimize Ambiguity: Avoid using vague category names like “Important” or “Miscellaneous.” Strive for specific and descriptive labels that accurately reflect the email content.
Avoiding Category Overload
While categories offer a powerful way to organize, creating too many can be counterproductive:
- Start Small and Expand Gradually: Begin with a handful of core categories and subcategories. As your needs evolve, you can gradually add more specific labels.
- Merge Similar Categories: Regularly review your categorization system and identify any categories that overlap or have become redundant. Consider merging them to streamline your system.
- Archive Outdated Categories: If a category no longer serves a purpose, archive it to avoid cluttering your active list. Archived categories can be reactivated if needed in the future.
Regular Review and Refinement
Your needs and workflow may change over time. Regularly review your categorization system to ensure it remains effective:
- Evaluate Category Usage: Analyze which categories you use most frequently and which ones seem underutilized. This can help you identify areas for improvement.
- Adapt to New Workflows: As your work evolves, consider modifying your categorization system to accommodate new projects, clients, or communication styles.
- Embrace Feedback: If you’re working in a team environment, solicit feedback from colleagues on the effectiveness of the categorization system. This can help you identify areas for improvement and ensure the system works for everyone.
Also Read: How to Use Copilot in Outlook? – A Complete User Guide
Conclusion
Imagine a world where your inbox is no longer a chaotic abyss of unread emails. With the power of Outlook categories, you can transform your inbox into a well-oiled machine, boosting your productivity and reclaiming control of your time.
By implementing the strategies outlined in this guide, you can:
- Effortlessly organize your emails: Categorize emails based on project, client, priority, or any other relevant criteria.
- Find emails in a flash: Leverage the navigation pane and advanced search features to locate specific emails with ease.
- Prioritize effectively: Use color-coding and category filtering to focus on the most important emails first.
- Automate repetitive tasks: Set up rules to automatically categorize emails based on pre-defined criteria, saving you valuable time.
- Enhance collaboration: Share your categorization system with your team to ensure consistent communication and information flow.
Outlook categories offer a simple yet powerful way to transform your email management experience. By embracing this organizational tool, you can achieve a state of inbox zen, allowing you to focus on what truly matters in your work and life.
Frequently Asked Questions:
Can I share my categories with colleagues?
Yes, you can share categories with colleagues if you have a shared mailbox or are using Office 365 with shared calendars and contacts.
Do categories affect email storage?
No, categories do not affect the storage of your emails. They are simply labels that help you organize and find emails more efficiently.
Can I delete a category I created?
Yes, you can delete categories you no longer need. However, it’s important to note that deleting a category will also remove it from all emails that were previously categorized under that label.
Here’s how to delete a category:
- Outlook Desktop App: In the ribbon, go to the “Tags” section and click on “Categorize” followed by “All Categories.” Right-click on the category you want to delete and select “Delete.”
- Outlook Web App: Open any email and click on the three dots menu (…) in the toolbar. Choose “Categorize” and then select “Manage Categories.” Click on the category you want to delete and choose “Delete.”
How can I hide unused categories?
While you can’t directly hide categories in Outlook, you can effectively achieve a similar outcome by archiving them. Archived categories are still technically there but won’t clutter your active list.
Here’s how to archive a category:
- Follow the same steps as deleting a category (mentioned above) but choose “Archive” instead of “Delete.”
Can I assign multiple categories to a single email?
Yes, Outlook allows you to assign multiple categories to a single email. This can be helpful for emails that fall under multiple categories or projects.
Here’s how to assign multiple categories to an email:
- Select the email you want to categorize.
- Right-click anywhere on the message and hover over “Categorize.”
- A list of your existing categories will appear. Hold down the Ctrl key (Windows) or Command key (Mac) and click on all the categories you want to assign to the email.
How do I reset my categories in Outlook?
To reset your categories, go to “File” > “Options” > “Mail” > “Categories” and click “Reset”. This will restore the default categories.
Can categories be backed up and restored?
Yes, categories can be backed up by exporting your mailbox to a .pst file, which includes your category settings. You can restore them by importing the .pst file back into Outlook.