Is your printer stubbornly refusing to cooperate? We’ve all been there – you need to print that important document, but your printer seems to have other plans. Fear not! This guide will walk you through troubleshooting common “Windows cannot connect to the printer” issues and get your printing back on track in no time.
Why won’t my printer print the documents?
There can be several reasons why your printer isn’t working. Here are some common culprits to check:
Basic Issues
- Is the printer powered on and securely connected (USB cable/Wi-Fi)?
- Is there enough paper loaded correctly?
- Are the ink/toner cartridges full and properly inserted?
- Is the desired printer set as the default in Windows settings?
Connection Problems
- Restart your printer, computer, and router (if using Wi-Fi).
- Verify your Wi-Fi network is working and both the printer and computer are connected to the same network (for Wi-Fi printers).
- Forget and reconnect to the Wi-Fi network on the printer (for Wi-Fi printers).
Driver Issues
- Update the printer drivers from the manufacturer’s website.
- Reinstall the printer drivers in Windows.
Advanced Troubleshooting
- Run Windows Update to ensure your system is up-to-date.
- Utilize the built-in Windows troubleshooter to diagnose and fix printer problems.
Let’s understand each issue that makes your printer not printing your documents on Windows
Check the Basics Supplies for Printer
Before diving into more advanced troubleshooting, let’s ensure everything is set up correctly to avoid common “printer error” messages. Here are some basic checks to perform:
Power & Connection
- Is the printer powered on? This might seem obvious, but it’s easy to overlook in the heat of the moment. Double-check that the printer is switched on and the power cable is securely plugged into both the printer and a working outlet.
- Is your connection secure? For USB connections, ensure the cable is firmly plugged into both the printer and your computer’s USB port. If you’re using Wi-Fi, verify that the cable connecting your router to the power outlet is secure.
Paper & Ink
- Paper Tray Check: Open the printer tray and make sure there’s enough paper loaded correctly. Ensure the paper isn’t jammed or creased, and the size and type of paper match your printing requirements.
- Ink or Toner Levels: Low ink or toner cartridges can cause printing errors. Check the ink or toner levels according to your printer’s instructions. Most printers have indicator lights or on-screen notifications to warn you when ink or toner is running low. Replace empty cartridges before attempting to print again.
Set as Default Printer
- Is the correct printer set as default? Sometimes, the wrong printer might be selected by default. Here’s how to check:
- Go to Windows Settings (Start Menu > Settings).
- Click on “Devices” and then “Printers & scanners”.
- Ensure the desired printer has a checkmark next to “Set as default”.
Troubleshooting Connection Issues for Printer in Windows
If the basic checks haven’t resolved the “Windows cannot connect to the printer” error, let’s delve into some troubleshooting steps to establish a stable connection.
Rebooting for System Refresh
A simple yet surprisingly effective solution can often be restarting the involved devices. This can clear temporary glitches or conflicts that might be hindering communication between your computer and printer. Here’s what to do:
- Power Down: Turn off your printer, computer, and router (if using Wi-Fi).
- Wait a Moment: Allow a brief pause of 30 seconds to a minute for each device to fully power down.
- Power Up Sequentially: Restart your router first, followed by your computer, and finally, power on your printer. This ensures a proper boot sequence for all devices.
By restarting these devices, you can potentially clear temporary memory issues and allow them to re-establish communication channels, potentially resolving the “Windows cannot connect to the printer” error.
Verifying Network Connectivity (For Wi-Fi Printers)
If you’re using a Wi-Fi printer, ensuring a stable network connection is crucial. Here’s how to verify connectivity:
- Confirm Wi-Fi Functionality: Start by verifying that your Wi-Fi network is functioning correctly. Try connecting another device, such as your phone or laptop, to the same Wi-Fi network. If you can’t connect with other devices, the issue might lie with your router or internet service provider.
- Check Network Details (For advanced users): If your other devices connect successfully, you can delve deeper by checking if both your computer and printer are connected to the same Wi-Fi network name (SSID) and password. Some printers allow viewing network settings directly on the printer’s display. Consult your printer’s user manual for specific instructions on how to access these settings.
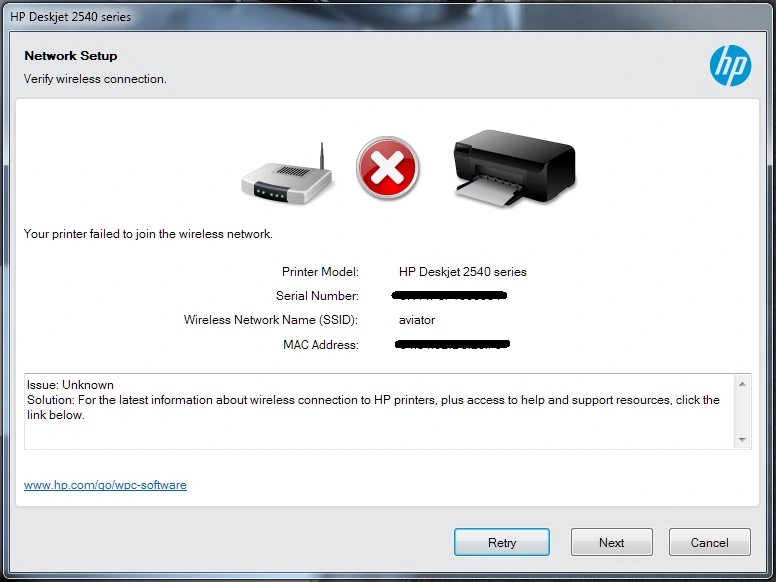
By ensuring both your computer and printer are on the same network, you can eliminate network configuration issues as a cause for the “Windows cannot connect to the printer” error message.
Establishing a Fresh Wi-Fi Connection
Sometimes, a corrupted Wi-Fi connection on the printer itself can cause problems. Here’s how to “forget” the network and re-establish a fresh connection:
- Access Printer Settings: Refer to your printer’s user manual for specific instructions on how to access Wi-Fi settings. This might involve navigating menus on the printer’s display or using a dedicated button.
- Forget the Network: Locate the option to forget or remove Wi-Fi networks on your printer. This will erase any stored network credentials.
- Reconnect to Wi-Fi: After forgetting the network, follow the on-screen instructions (or consult your user manual) to reconnect your printer to your Wi-Fi network, entering the correct SSID and password.
By forgetting and reconnecting to the Wi-Fi network, you can potentially eliminate any corrupted connection information that might be causing the “Windows cannot connect to the printer” error.
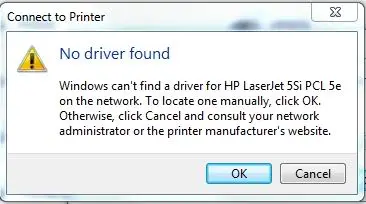
Addressing Driver Issues
Outdated or malfunctioning printer drivers can be a significant culprit behind “Windows cannot connect to the printer” errors. Let’s explore how to ensure you have the most up-to-date drivers and address any potential driver issues.
Updating Printer Drivers for Optimal Performance
Printer manufacturers regularly release updated drivers that improve compatibility with different operating systems and fix bugs. Here’s how to ensure you have the latest drivers for your printer:
- Identify Your Printer Model: The first step is to determine the exact model of your printer. This information is usually printed on a label on the back or bottom of your printer. You can also access it through your printer’s settings menu.
- Visit the Manufacturer’s Website: Navigate to the official website of your printer manufacturer. They typically have a dedicated support section where you can download drivers for your specific printer model.
- Download and Install Updates: Locate the driver download section for your printer model and download the latest driver compatible with your Windows version. Once downloaded, follow the on-screen instructions to install the updated driver.
By keeping your printer drivers up-to-date, you ensure compatibility with your operating system and potentially resolve issues that might be causing the “Windows cannot connect to the printer” error message.
Reinstalling Printer Drivers to Resolve Corruption
In some cases, the printer driver itself might be corrupted or missing essential files. Reinstalling the driver can often rectify these issues. Here’s how to reinstall your printer driver:
- Access Device Manager: In the Windows search bar, type “Device Manager” and click on the best match to launch it.
- Expand “Printers” In the Device Manager window, locate the “Printers” section and expand it by clicking the arrow next to it.
- Right-click Your Printer: Find your printer listed under “Printers” and right-click on it.
- Select “Uninstall device” From the context menu, choose “Uninstall device”. A confirmation window might appear; confirm the uninstallation.
- Restart Your Computer: Once the uninstallation is complete, restart your computer. This will prompt Windows to automatically detect and reinstall the printer driver during the restart process.
By reinstalling the printer driver, you replace any potentially corrupted files with fresh ones, potentially resolving the “Windows cannot connect to the printer” error.
Advanced Troubleshooting (if Basic Fixes Fail)
If the troubleshooting steps outlined above haven’t resolved the “Windows cannot connect to the printer” error, here are some advanced techniques to explore:
Ensuring Optimal System Performance with Windows Update
Keeping your Windows system updated is crucial for maintaining optimal functionality and compatibility with various hardware devices, including printers. Outdated Windows versions might lack essential updates or bug fixes that could be hindering printer communication. Here’s how to ensure you have the latest Windows updates:
- Access Windows Update: Click on the Start Menu and navigate to “Settings”. Within Settings, locate “Update & Security”.
- Check for Updates: In the “Update & Security” window, click on “Windows Update” and then select “Check for updates”. Windows will search for available updates and prompt you to download and install them if any are found.
- Restart After Installation: Once the updates are downloaded and installed, it’s crucial to restart your computer. This allows the updates to take effect fully and potentially resolve compatibility issues that might be causing the “Windows cannot connect to the printer” error.
By keeping your Windows system updated, you ensure it has the latest fixes and drivers that can improve printer functionality and potentially eliminate the connection error.
Leveraging the Built-in Windows Troubleshooter
The Windows operating system comes equipped with a troubleshooter specifically designed to diagnose and fix printer problems. Here’s how to utilize this tool:
- Access Troubleshooter: Open the Start Menu and type “troubleshoot”. Select “Troubleshoot settings” from the search results.
- Find the Printer Troubleshooter: In the “Troubleshoot settings” window, scroll down and locate the “Additional troubleshooters” section. Click on it to expand the options.
- Run the Printer Troubleshooter: Within the “Additional troubleshooters” section, find “Printer” and click on the “Run the troubleshooter” button next to it.
- Follow On-Screen Instructions: The troubleshooter will launch and begin diagnosing potential printer issues. Follow the on-screen instructions provided by the troubleshooter to attempt to fix any problems it identifies.
Learn: Fix ‘sign-in method you’re trying to use isn’t allowed’ in Windows ASAP
Conclusion
This guide has walked you through a comprehensive troubleshooting process to address the “Windows cannot connect to the printer” and other basic printer errors. We’ve explored various solutions, from verifying basic settings to updating drivers and utilizing advanced troubleshooting tools.